【Origin Pic】 |
|
|
|

Dongguan Meijun Automation Equipment Co., Ltd.
Service Hotline:+86-769-82261696+86-132-1539-2671
Dongguan Meijun Automation Equipment Co., Ltd.
Service Hotline:+86-769-82261696+86-132-1539-2671
Products Center

Tel:+86-769-82261696
Q002 US EMPAIR air-controlled sand control valve
The left is the rubber core I-shaped seat The right is the piston air pump The following is the independent sand outlet tee
1) The I-shaped seat is an external rib 2-inch interface, the upper thread is connected to the bottom of the sand tank, and the lower thread is connected to the 45-degree sand outlet tee of the inner hole;
Built-in wear-resistant rubber core Height 110 mm *diameter 45 mm*bore diameter
I-shaped block: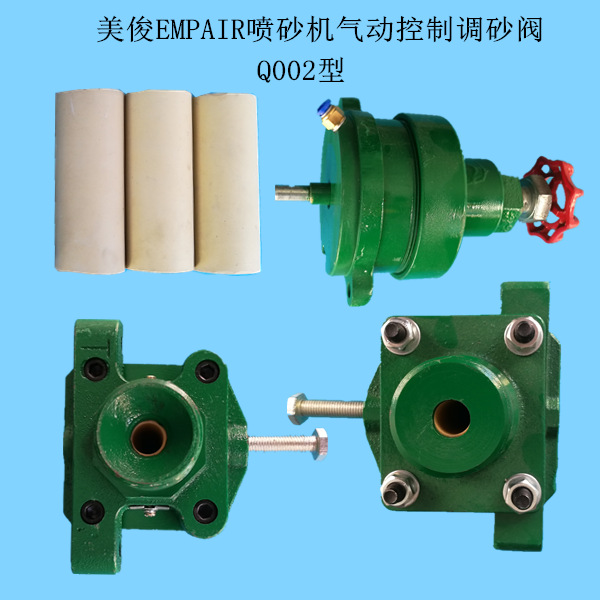
2) Piston air pump: also known as air bag
The original use of rubber pads and springs to control the displacement of the thimble is easy to break, but now it has been improved, and two piston rubber rings are used to make the displacement of the thimble more smooth.
The sensitivity is higher, the key is to increase the service life, easy to replace, and the cost is greatly saved.


3) Thickened sand tee The upper is 2 inch inner teeth (general water pipe teeth) The front is 1.2 inch outer teeth, the sand tank joint or adapter is connected, and the rear is 1.2 inch inner teeth , connected to the air supply pipe
The sand production tee of many companies is integrally connected with the sand valve. Once damaged, it must be replaced in a complete set.
Increase the bottom wall thickness, increase the wear time, and at the same time change the 90-degree vertical to 45-degree oblique angle of the sand drop port in the tee, in order to form a same-direction airflow path with the airflow coming from behind
Diameter, increase the effective power of the particles in the sand valve, reduce the rebound and swirl of the sand particles at the bottom of the sand valve, and reduce the wear of the tee and the sand cylinder joint.

Sand adjusting valve steps:
In sandblasting operation, according to the sandblasting state, adjust the handle on the manual abrasive valve to adjust the size of the abrasive outlet flow. Abrasive The traffic should not be too large,
Viewed in the sun or other bright light source, the air stream containing abrasive Pure air flow doesn't make much difference.
■Steps for sand control with air-controlled sand control valve:
If the pneumatic control sand control valve is used, the valve core in the I-shaped seat is closed under the normal shutdown state.
1) The left screw needs to be adjusted to the middle part of the rubber core of the sand valve
2) Adjust the nut under the handle bar of the sand regulating valve on the right, and transfer it into the right beam in the extrusion I-shaped seat, so that the right beam in the I-shaped seat squeezes the rubber core to the left to the middle part, and squeezes the left beam on the left screw. The rubber core is closed to form a closure.
That is to say, the left screw and the right nut are tightened to the valve core at the same time, so that the valve core is in a closed state. When the manual switch is pressed, the compressed air will squeeze the rubber in the sand regulating valve after entering the sand regulating valve, so that the inner spring of the sand valve shrinks. , the thimble is retracted to the right, so that the right beam in the I-shaped seat is returned, the channel in the rubber core is opened, and the abrasive passes through the sand valve to form a sandblasting work.
Check the best normal state of the second and second steps above: there is a slight airflow out of the muzzle (not a lot of rushing out) and no sand is ejected is the best effect.
3) After the above 2 steps are adjusted, the test machine works. If the spray gun still does not produce sand or the sand production is too large, you need to adjust the handle switch on the right side of the sand valve (that is, behind the nut), clockwise to reduce the sand amount, Counterclockwise is to increase the amount of sand.
When adjusting, it must be fine-tuned, adjusted one by one, adjusted, and sandblasted until it is suitable.
Wechat QR code